Showing posts with label recipebook. Show all posts

Monday, January 27, 2020

Tofu scramble wrap

Fry tofu scramble, onion, artichoke hearts, mushrooms.

Add to wrap with green pepper and spinach.

Adulting: Meal planning

This is more for me then you.

I'm picking back up my old old blog to create a recipe book, plus or minus the actual directions cause I already know how to cook everything in it. I just want to be able to look up my own tried and true meal ideas. Maybe it'll help someone else. Who knows. Feel free to ask for clarification on anything that looks delicious enough to try yourself.

Wednesday, August 10, 2011

Blueberry-Peanut Cheesecake

This recipe came from a book called 500 Desserts by Ann Kay with the slight change of having peanuts rather then walnuts.

What you will need:

350g of blueberries
1 tbsp of honey or agave nectar
6 tbsp of sugar
1 tsp lemon juice
1 tbsp lemon juice
3/4 cup of cream cheese
1 egg
1 tsp of liqueur (optional)

For the base:
1 2/3 cups of peanuts
2/3 cup flour
pinch of salt
4 tbsp butter
5 tbsp brown sugar
1 egg yolk (I used the whole egg)

Starting with the base:

1. Ground peanuts (I used a potato smasher, works just fine, could also put them in a zip lock and roll over them with a can of a soup until satisfied.)
2. Mix ground peanuts, flour and salt in a large bowl.
3. In another bowl cream butter and sugar. Beat in egg yolk (I just put the whole egg in, didn't hurt!).
4. Fold creamed bowl slowly into peanut-mixture until well combined.
5. Press crumble into a greased 9 inch pie dish, covering completely and evenly.
6. Cover and chill for 30 minutes minimum.
7. Bake crust for 15 minutes on 350 degrees Fahrenheit, let cool before adding filling.

The topping:

1. In a heavy frying pan combine blueberry, honey or agave nectar, 1 tbsp of sugar, lemon juice.
2. Cook for 5-7 minutes over low heat, stirring often. Berries should give off some liquid but retain their shape (I used frozen berries thus they gave off a lot of liquid, no worries).
3. In a new bowl beat cream cheese and  5 tbsp of sugar until fluffy.
4. Add an egg, 1 tbsp of lemon juice, the liqueur (if you choose) and the cream. Beat until blended.
5. Pour mixture into crust.
6. Bake for 25 minutes.
7. Cool on a wire rack.
8. Cover and chill for at least an hour
9. Spread blueberry mixture over the top.

Enjoy!

Monday, August 1, 2011

Vegetarian Pot Pie with Sweet Potato-Bechamel Sauce

The finished product!
I don't know if you've ever noticed but vegetable pot pie in the store is an outrageous price. At least around here, and you can only the single serving size (which comes 2 in a box normally). Thus, even though I love love love pot pie it ended up on list of food I only buy as a treat.

Then I figured out how to make pot pies only better. I even have a (not-so-)secret special sauce that came out of a mistake the first time I made them. You just must try this pot pie!!

You will need (for 2 pies):
  • Root vegetables
    • 4 small potatoes, 1 small turnip, 4 carrot, 1 parsnip (I actually forgot the turnip in mine, but it's all your own preference)
  • Salt and Pepper to taste
  • Olive oil to drizzle
  • A handful of Broccoli
  • A handful of Cauliflower
  • 1 Sweet potato
  • 1 package of Bechamel sauce (pictured below)
  • 4 pie crusts (2 bottoms, 2 covers -they often come 2 in a box, thus 2 boxes)
  • 4 hours (don't worry, it's mainly a waiting game that you can speed up if need-be)
Root veggies prep:
  1. Peel and chop up all your root veggies into chunks (excluding the sweet potato).
  2. Salt and pepper to taste on a baking tray.
  3. Drizzle with oil.
  4. Slow roast for three hours on 250 Fahrenheit.
    1. In a rush? Though I haven't tried it I'm sure you could up the temperature and take out once they're all soft.
  5.  Wait for 2.5 hrs before continuing.
Special Sauce Prep:
  1. Peel and slice the sweet potato in smaller the better chunks.
  2. In just enough water to cover the sweet potatoe in a large pot bring water to boil.
  3. Once the sweet potatoe has lost most of it's shape /is soft enough to make into mush add the Bechamel Mix. You may need to add more water then the package says since you also have the sweet potato. The water can be replaced with milk if you like.
  4. If it's not thick enough you may wish to add flour.
  5. Adding any drippings from root veggies.
Steamed Veggies Prep:
  1. Boil a medium sized pot of water
  2. Add Cauliflower
  3. Wait a minute then add broccoli
  4. Wait max of 5 minutes and remove veggie from water.
  5. Alternatively use a veggie steamer.


Final Stage:
  1. Poke holes with a fork in each pie and bake for 10 minutes approx.
  2. While on a baking tray fill 2 bottoms with an equal amount of root veggies (you may wish to chop your root veggies smaller)
  3. Repeat with steamed veggies.
  4. Pour sauce on top, don't worry if it's not level, just as long as it doesn't go over the sides.
  5. Place your tops on, pressing sides together with a fork if possible.
  6. Bake on 300 Ferenheit for 30-40 minutes.

Thursday, July 28, 2011

Cookie Dough (eggless)


Pretty simple recipe I found here: Single Serve Cookie Dough

It's eggless, no-bake and thus ready to eat.

Though that site gives you the ingredient amounts for a single serving. We've made this twice now and couldn't resist upping the quantity, if only so we can have leftovers.

Additionally, the site strangely doesn't give a butter quantity and we've found it's best refrigerated.

 Okay, so voila the larger version of the same recipe;

1/2 cup Butter
1 tsp Vanilla Extract
1 cup Flour
2/3 cup Sugar
Up to 1/4 cup Water/Milk
As many Chocolate Chips as you desire
(Maybe replace chocolate chips with peanut butter chips or butterscotch or vanilla... M&Ms perhaps )

Melt & mash butter.
Add everything else but water and chocolate chips.
Slowly add water (or milk) until it reaches desired consistency.
Add chocolate chips.
Refrigerate(Do not bake! Will not make good cookies)
Enjoy in moderation ;)

Monday, July 25, 2011

Quinoa Sliders


These are amazing. I made them Friday morning to take to the cabin and as soon as I came back Sunday night I made another batch. Approximate cost per slider = 41 Cents and that generously giving all the teaspoon of this and that like sugar and salt a value. Of course you may want to have a bun with it (I recommend the thin buns) and some mayo or other condiment of choice. But this point is these are delicious, cheap and easy to make.

So the recipe I used can be found here: http://eatingwelllivingthin.wordpress.com/2010/11/01/love-my-quinoa-burger/ but of course as everyone does I tweaked it a little. Namely, I used much more green onion and I made many more burgers as a result of doing them mini sized (aka Sliders), making my outcome 22 where that recipe says its more like 10.

Also, the first time I made them my quinoa was a little runny so I had to add A LOT more flour. When you're at that point, just add one tablespoon at a time until it's no longer runny, similar to a thick pancake.

Recipe below but first a word on Quinoa. One of the new biggest trends in world foods with all essential amino acids (aka is a "complete protein"). This site also boasts that "Because quinoa is a very good source of manganese as well as a good source of magnesium, iron, copper and phosphorus, this "grain" may be especially valuable for persons with migraine headaches, diabetes and atherosclerosis." Other ailments that site boasts quinoa as an aid for include: heart failure, antioxidant protection, breast cancer, childhood asthma, gallstone prevention, ischemic stoke, insulin resistance, obesity and premature death (though the whole time they say these are the benefits of quinoa as a grain and at the very end they admit quinoa is a seed). Hence it's title as a super-food.

While that shit's awesome, what concerns me about quinoa is actually it's effects as an international food product. It's regularly called "the gold of the incas", incas being the pacific ocean side of South America basically. The issue is when the Global North decides that Quinoa is a super food, and decides it's worth a higher price, the people who cultivate it can no longer afford it. We pay for it to be shipped to different hemispheres yet sometimes we neglect to pay the farmer. As a super food, this seed has been a staple in the diets of a whole society before we understood what amino acids even were. When we rip that staple food and source of nutrient out of that society, people die from not having the money to buy the seed they planted and thus not having those nutrients in their diet in a society where nutrients are scarce. It's more complicated then this paragraph obviously and perhaps I'll post a whole entry of the politics of food (or maybe a series of posts).

The best option of you love these burgers /love quinoa /are sold on the benfits of quinoa is to grow it yourself. Google it, it's really not that hard and is a very adaptable plant. I'm currently trying to grow it, I'll let you know how that turns out in the fall.
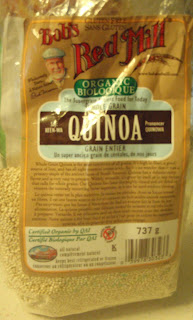
Next best option, be aware of how you buy it. From who, where it's produced, etc. Fair trade symbols are key. Living in Newfoundland, I haven't yet found fair trade quinoa. However, I bought Bob's Red Mill brand, as depicted. Bob's Red Mill is a co-operative in America, producing all whole grain, gluten free and organic foods (all non-GMO). Most of their products are grown in Canada and America however the quinoa is grown in Ecuador. I've actually just e-mailed them to ask if it is fair trade by stroke of luck. If i find out it isn't, I'll be re-emailing them the benefits of fair trade and also searching harder for fair trade quinoa elsewhere.


I'll repost the recipe below in case the link becomes corrupt or some other non-sense. (Bolded words and pictures are are mine, the rest below is from the link above).

1 cup uncooked quinoa
2 cups water
1/2 teaspoon salt

In a medium saucepan bring the 2 cups water and 1/2 teaspoon salt to a boil over high heat.  Add quinoa and reduce heat to low.  Cover and cook for 18-20 minutes, or until all water is absorbed and the seeds are tender.  Allow to cool for a few minutes. (I first went by the recipe on the bag of Quinoa but this one worked a lot better. Picture depicts cooked quinoa.)
 

OR 2 rounded cups cooked, leftover quinoa
.

3/4 cup shredded cheddar cheese (or other variety, if you prefer)
1/2 cup cottage cheese
1 medium carrot, finely grated
3 eggs
2 tablespoons all purpose flour
2 green onions, including white parts (I used a lot more, basically just cut off what needed to be cut off regardless -you do know to keep your green onions in a glass of water on the window sill right?)
1 /2 teaspoon Splenda or sugar
1/4 teaspoon black pepper
1/4 teaspoon ground cumin
1/8 teaspoon salt
1/8 teaspoon garlic powder (I used a teaspoon of minced garlic)
Olive oil for frying
.
In a large bowl combine the cooked quinoa, cheddar cheese, cottage cheese, carrot, eggs, flour, green onions, Splenda, pepper, cumin, salt, and garlic powder. (Combine everything but olive oil, if runny continue adding a tablespoon of flour at a time until similar to thick pancakes).

Heat a frying pan and a couple teaspoons olive oil over medium-low heat.  Measure 1/4 cup and form into patties about 1/2 inch thick  - mixture will be slightly sticky.  Fry until golden-brown, about 4 minutes on each side.   Makes approx. 10 burgers. (I made them about a tablespoon and a half each to make sliders and had 22 total as an outcome)


***
A note from a friend of mine:
An important note - the brand you buy seems to be pre-rinsed/soaked which is awesome, but make sure for those who are trying it with a different brand, that if they don't know whether it's been pre-soaked, may need to rinse + soak for a couple of hours for the bitter coating to wash away from the grains. Quinoa is a unique grain in that respect for preparation! But well worth it.

Sunday, May 22, 2011

Sprouting Lentils

Go buy a bag of dry green lentils right now.

It cost me $1.89 and lasts a very long time. They're great protein addition to pasta dishes or stir-frys, great snack by themselves (although I don't like them this way myself), once sprouted awesome addition to a toss salad and are probably the best-cheapest things you can buy for your pantry.

You'll probably find them in the beans section next to the dry split peas. Careful to get green lentils and not red ones if you hope to sprout them. Red lentils are generally split and wont  sprout.


Take a look at the nutritional info right from the bag ~~>
Amazing source of Protein, Iron, and Fibre... what else could you ask for?

So how do you make them edible? They're as hard as rocks in the bag!

I'll briefly talk about 3 ways, spending much more time on the third (sprouting). Any way you choose make sure to rinse them first. Both the first and second way would also work for split lentils (including red lentils).

If you've got no time, cooking right now and didn't really think ahead... boil them. Pretty simple, much like split peas. They wont really get much bigger them the original size. Just throw 'em with your soup or in a pot alone, adding it to your dish afterwards. You'll know they're done when you can bite threw one.

If you've got anywhere from 4 hours to a day, measure out half the amount you want, rinse, and soak them in water. They will double in size, so make sure they have enough water to cover them even at double size. Drain the water, add them to your dish.

The pictures depict the same lentils before and after soaking in water overnight.

Finally, sprouting. This four days but feel free to use some on even the third day if you feel like it. But most importantly, be prepared to use them all between the fourth and the sixth day, they wont keep well beyond that.

I used a medium size mason jar, about a 1/2 cup of dry lentils and a bit of cheesecloth (found at dollerama). I used the mason jar lid without the actual lid, just the screw on sides, to keep the cheesecloth in place.

The first night, just soak them in water, easy peazy. The 2nd day, drain all the water out (why the cheesecloth is useful), fill it back up and swish it around and drain it again. After that first night, you always shake out as much water as possible. For the next four days, repeat this 2-3 times daily. This is so you don't get anything else growing in there.

You'll notice the lentils starting to sprout after the 2nd night (pic to the left) and after the 3rd night you get something like the picture to the right. At any point these are edible after about the 4 hour mark but when you really want to chow down is when you see leaves, after the 4th night. (See first picture at beginning)

Now don't forget to eat them all before 6 nights have passed!

I heard about sprouting from this fine blog here: http://honestfare.com/windowsill-sprouting-through-the-winter/

Tuesday, May 10, 2011

Pita Pizza!

The only hard thing about homemade pizza is the crust... the rest is just throwing on toppings. Thus this is a super simple recipe!

Don't worry, it doesn't include a frozen crust either! I'll teach you how to make tortilla shells from scratch later, but that is what we're using for the crust -so go grab some at the store or tackle the recipe here at Om Nom Nomnivore yourselves -though I definitely recommend a partner in the kitchen for that recipe!!


But for now...

You'll need:
  • A whole wheat pita for every person (those are generally thicker tortillas)
  • Enough salsa to cover each pita
  • Bowl of mushrooms, sliced
  • Bowl of broccoli, sliced
  • Ramekin of Bell Peppers, chopped
  • A sprinkle of cheese
  • Optional: Lentils that have been soaking for several hours at least
Pretty basic really. Lay out your pitas on what you're cooking them on, perhaps a pizza pan. Cover them in salsa. Add lentils if you've chosen to. Evenly distribute the vegetables. Sprinkle on cheese. Bake for 10 minutes at 350 degrees Fahrenheit. If you notice the broccoli burning before that, take it out -they're done!

Thursday, April 14, 2011

What use to be the carrot patch...


After work today I went straight to work on these carrots... they were at risk of going bad, having being plucked from the earth last fall (we ate a ton before now). So I went to work on a double batch of the following recipe;

Carrot Cake Recipe

1 1/4 cups corn oil
2 cups sugar
2 cups all-purpose flour
2 tsp. cinnamon
4 tbsp. nutmeg
2 tsp. baking powder
1 tsp. baking soda
1 tsp. salt
4 eggs (I used half actual eggs and half vegan egg replacer)
4 cups grated carrots
(Optional: Nuts!)

Directions:
Preheat the oven to 350°F. Grease and flour 2 loaf pans pan. In a large bowl mix together corn oil and sugar. In a different bowl, sift together the flour, cinnamon, baking powder, baking soda and salt. Add half the flour mixture to the oil-sugar mixture and blend well. Add the remaining dry ingredients with the eggs, one at a time. Mix well. Add the carrots and mix.

Pour the cake batter into the tube pan. Bake for 50 minutes, or until done. Cool and frost.

This was a variation from www.muchmenus.com/Carrot_Cake_Recipe.htm